TrainerRoad – Step 1 – Check your Equipment
March 13, 2016 in Cycling by MG
As I explained in the last post, I use TrainerRoad for my indoor training.
I think it is a wonderful cycling online training tool. But many people never really discover what a great training tool TrainerRoad is since they get intimidated by the whole process of setting up and using the software. I thought that giving you a bit more information about how I made it work for me, might take the mystery out of setting up and help you get on that trainer.
The TrainerRoad website is very logically organized and it literally takes you by the hand by providing step by step instructions all the way from choosing the equipment to selecting a training plan. It divides the instructions in five parts:
Step 1: Check Your Equipment
Step 2: Install the Software
Step 3: Pair Your Devices
Step 4: Your First Power Test
Step 5: Choose a Training Plan
I want to go through each of those steps here in my blog. Since it would not be practical to cover all of the steps in one post , I will do it in piecemeal. I also want to explain each of the steps by explaining how I follow it in order to get it working for my circumstances. So, this post is all about step 1.
Step 1 – Check Your Equipment
Below you see the first step. Here is where you choose the trainer and the device you plan to use to measure power, heart rate, speed and cadence. You have the three choices that the TrainerRoad software supports: a power meter, the Virtual Power provided by the Trainer Road software or an electronic trainer. So, here you just click Check Your Devices.
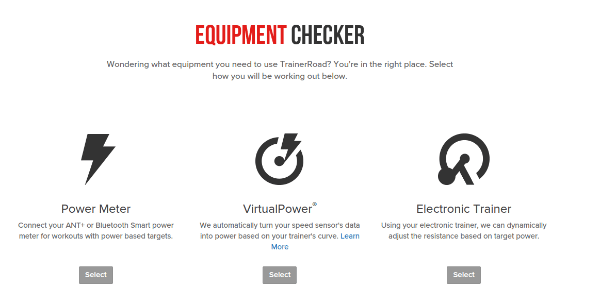
 The next screen you immediately go to is the equipment checker (which you can see below), where you select the device you are planning to use. Again the three devices that TrainerRoad supports are: Power Meter, Virtual Power or Electronic Trainer.
At the time I was trying to get set up with TrainerRoad, I did not own a Power Meter nor an Electronic Trainer. All I had my 1991 Specialized Allez and a CycleOps Fluid2 trainer, so I selected Virtual Power. I read throughout their website to figure out what Virtual Power was. Virtual Power is a feature offered by their software which uses the rider’s speed and the specific trainer’s power curve to calculate the power online. It seemed like it was the least expensive alternative for me since I did not have to purchase a Power Meter nor an Electronic Trainer. I clicked on the Select button under Virtual Power.

After selecting Virtual Power, I got to the screen you see below. The first question on the screen is… “Does your screen work with VirtualPower?” Here is where you select the trainer you are going to be working with. In my case, it was the CycleOps Fluid 2. If you don’t own a trainer and you are just trying to select your best options for TrainerRoad, just click on the drop down menus for both the Manufacturer and Model to see all the trainers supported by TrainerRoad.
Also, as you scroll down the page, you can see the second question… “Do you have a Speed Sensor?” The speed sensor is needed since the VirtualPower uses the speed and the trainer’s power curve to instantly give you your power online. Your bike probably has either a speed sensor or a cadence/speed sensor. Either one will work. If you have a cadence/speed sensor, it works as well since their software supports cadence. If you only have the speed sensor, that is fine too as the cadence is not really required. So, I did not have to buy any extra equipment as my Specialized Allez had a Garmin speed/cadence sensor installed when I took it out of retirement. Notice that there is a newer version of the Garmin Bike Speed and Cadence Sensor.

Immediately after you finish with the trainer and speed sensor selection, your screen takes you to the selection of the connecting device. So, you have the bike, the trainer, the speed or speed/cadence sensor and now you have to connect everything to your computer so it becomes readable to the TrainerRoad software. So, below you see what the screen looks like. Basically, the device needed depends on the hardware you plan to use to train. In my case, I wanted to use my desktop since it had a very nice 30 inch monitor. The website contains explanations about all the choices and provides descriptions and links to help you decide how you are going to connect your devices. So, you need to read through their website to see the different choices which depend on the hardware and how you want to connect. Descriptions and explanations are provided of all the choices. But in this section is where I got a little stuck…well, not really…I was totally lost since I am…embarrassed to say… electronically challenged. My husband and son helped me in this section and actually made the selection for me, which was the Suunto Movestick Mini.

So, I purchased all my equipment and I was ready for Step 2 (post coming soon).
Summary – My Equipment
To summarize, this is the equipment I used to get started with Trainer Road.
1991 Specialized Allez
CycleOps Fluid2 trainer – $301.99
an older version of the Garmin Bike Speed and Cadence Sensor – $59.95
Suunto Movestick Mini – $30.09
This post contains affiliate links and I will be compensated if you make a purchase after clicking on my links.


